Work Page 2023
Ron's 69 Ford Bronco U-14

Stock Photo
Introduced in 1965 for the 1966 model year, the Ford Bronco was offered with three body options: a three-door utility vehicle, a doorless roadster, and a half-cab pickup. The latter is codenamed U14
The Half Cab pickup version enjoyed substantial popularity during the '60s. With its small truck bed and compact dimensions, the U14 (chassis code) proved to be very helpful as a farm vehicle or light delivery truck. However, in early '70s the Half Cab fell out of favor, and Ford decided to retire this variant.
The last model year was 1971, and Ford produced only 1,503 Broncos with a truck bed behind the cabin. Today, the U14 is not as popular or considered as valuable as the Roadster, but is still a very cool and desirable early Bronco.
Ron's Daughter Tori and her Mom, 1972

My Grandson Silas, 2022
This example is owned by R.E. Sherrill, my friend and owner of Sandy Creek Boat Repair
A pic of it with my grandson Silas.
We have the doors and they will be installed
It has been in Ron's family since new.
His Dad E.E. Sherrill used it as a mail truck in Waco, and on deer leases and it has spent the last 37 yrs at Sandy Creek Boat Repair working it's little butt off.
But it is tired, very tired,
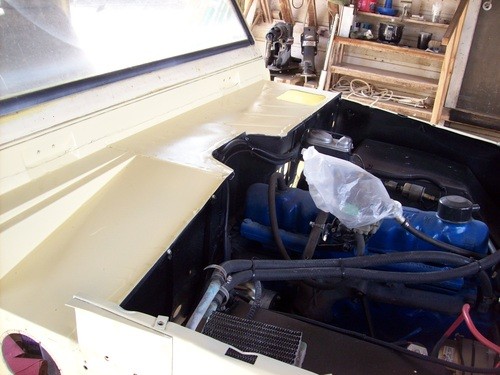
Broncosaurus will be able to start itself for the 1st time in 3 yrs. No more push starts, no more pull backs, after push starts that did not start.
So it is flywheel ring gear, and while I am in here, clutch, pressure plate, throwout bearing ,pilot bearing shift linkage bushings, and so forth.
Also I will begin work on its battered body starting with front clip.
Many things will not get done as it might in a full restoration yet it will continue to yank boats of all sizes up to 30 ft, in second gear. With 144 cubic inches .
And look/feel better in the process!
INITIAL PICS
A pic of it with my grandson Silas.
We have the doors and they will be installed
It has been in Ron's family since new.
His Dad E.E. Sherrill used it as a mail truck in Waco, and on deer leases and it has spent the last 37 yrs at Sandy Creek Boat Repair working it's little butt off.
But it is tired, very tired,
Broncosaurus will be able to start itself for the 1st time in 3 yrs. No more push starts, no more pull backs, after push starts that did not start.
So it is flywheel ring gear, and while I am in here, clutch, pressure plate, throwout bearing ,pilot bearing shift linkage bushings, and so forth.
Also I will begin work on its battered body starting with front clip.
Many things will not get done as it might in a full restoration yet it will continue to yank boats of all sizes up to 30 ft, in second gear. With 144 cubic inches .
And look/feel better in the process!
INITIAL PICS

Ready to pull engine

Engine will be soda blasted and repainted

First will be removal of all old repair compounds


Now for the passenger side

Much to do here, will require reinforcement

Bi-axial weave and epoxy for strength


Upper frame to suspension blasted/primed painted

All frame top to mid, undercoated

Ready to mount flywheel/clutch

Yes, I wil get that overspray off the carb.

Raditaor cleaned, primed, painted, new cap.

"HAMMER TIME"

I will out a new hood catch on it.

Radiator removed

Engine compartment will be blasted and painted

Ready to hammer/dolly some dents and remove rust

Hours later, we are back into primer phase


Beginning the filler stages in this area, rust gets removed sectionally.

My grandson Micah inspecting my work.

Wheels/Spindles will be another stage

All prepped areas to be painted Meadowlark Yellow.


Flex fan all cleaned and painted


I will beaton it for awhile and see how it goes.

That is the worst area, it will take creativity

Up and out we go.

53 years of hard labor!


Glazing a few small imperfections


First primer to check high/lows

Inner panels blasted and primed

Motor well soda blasted and primed/painted black

Engine soda blasted and painted, 3 coats

All boled in, moving along,


7/21 update

Primer used just as an indicator to see where I am

I think I can get it to where it will be passable.

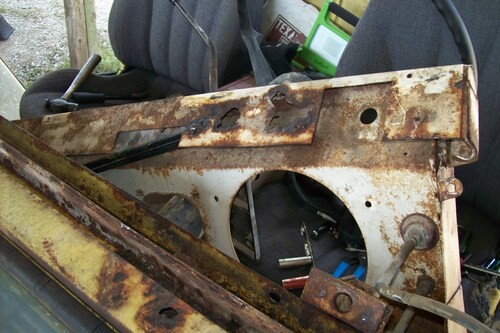
Time to get into the cab, oh joy....


Wiper motor first

Over 37 yrs since the top was off.


Much to deal with on this side;

It is the hidden things that come to light....


cut cut, snip snip

Will need some floor plates replaced

Now to pull heater/core

A few leaves in the ducting :)

New Solenoid

Tidying up the wire looms

Refurbishing clutch actuator

Epoxy used to repair worn bushing lands.

Removing steering shaft from column

New muffler system/ hanger/old lead pipe

All pedals and Column tube next

Ordering worn parts from steering tube

Primed and painted

Replace brake/clutch pedal bushings

Primed for paint

Organizing hardware

Ready to cannibalize new tube

New thrust spacers installed in arms

New upper bearing/bushing installed

Starting on the hood

Slide hammer needed on the nose


Starting to grind for fiberglass underlayment

Next I will hammer out dents and fill where needed

Almost there,a little more blocking to go.

Fender wells, aprons, cowl ,taking finish


Other floor panel out, continuing on firewall finish

Inside of grille Primed/Painted


Ready to pull the top


Plenty of penetrant oil later..windshield hinge worked.

Bye Bye old dash

Bye Bye old wiring harness


First good bath in 50 yrs


Flattop anyone?

New battery tray


Still play in column, will remove/rebuild

New felt and bushings on equalizer

Lead pipe rebuilt at Meineke Muffler

Pulling everything off the firewall

I will garnet blast, re-paint,re-bush

After blasting

Next is the vent box

New collar and shift tube

After wire wheel, removing residual rust from hardware


Prob with old tube was broken spot weld on pawl

Working on collar installation

I will repair cracks in steering wheel later on.

Underside crack area already repaired

Starting to drill for the pull

Coming along nicely

Glass on, etching primer shot to see ups/downs

The glass will make a hole barrier for filler

Floor pan removed,Shooting the top coat test on side panel


Inside hood primed

Installing firewall blanket

Steering, Shifting, Braking, Clutching

Moving along, epoxy primer, final coat

Headlight bezels will be yellow

Many things to pull


After the prime, came the paint

Black lacquer-cool shadows

Hood-first coat. Picked up some dust

Now to block sand the hood for final coat

A mirror that The Ancient can see out of....

Base coat of yellow/clear

Now for some lighting and red letters.


Etching primer on small parts

2nd coat, sun drying


Dash assembly in progress

Speedo disassembled, needles painted onthe tips, glass cleaned

Grille inset done in gloss black

Time to get on the dash


Ready to soda blast

Fenders-outside- 1st coats

Mounting and aligning the sheet metal


Vinyl lettering installed
MORE TO FOLLOW

A Lincoln inside of a Ford